Create TOC

2006년 12월 1일

Python/socket에 timeout 설정

출처는 http://www.voidspace.org.uk/python/articles/urllib2.shtml

import socket
import urllib2

# timeout in seconds
timeout = 10
socket.setdefaulttimeout(timeout)

# this call to urllib2.urlopen now uses the default timeout
# we have set in the socket module
req = urllib2.Request('http://www.voidspace.org.uk')
response = urllib2.urlopen(req)

Python/map, zip, izip, loop, generator 속도 비교

코드

#!/usr/bin/env python
# -*- coding: utf-8 -*-
from itertools import izip, islice


# normal loop
def using_loop(ary):
    result = []
    for i in range(len(ary) - 1):
        result.append((ary[1], ary[i + 1]))
    return result


# built-in map()
def using_map(ary):
    return map(None, ary[:-1], ary[1:])


# built-in zip() 을 사용하는 방법
def using_zip(ary):
    return zip(ary, ary[1:])


# itertools를 사용하는 방법
def using_izip(ary):
    return [(x, y) for x, y in izip(ary, islice(ary, 1, None))]


# generator를 사용하는 방법
def using_gen(ary):
    return [interval for interval in intervals(ary)]


def intervals(it):
    it = iter(it)
    st = it.next()
    for en in it:
        yield (st, en)
        st = en


def doit():
    SRCLIST = range(1, 1000000)
    using_loop(SRCLIST)
    using_map(SRCLIST)
    using_zip(SRCLIST)
    using_izip(SRCLIST)
    using_gen(SRCLIST)

if __name__ == '__main__':
    import profile
    out = 'tmp.prof'
    profile.run('doit()', out)
    import pstats
    profObj = pstats.Stats(out)
    profObj.sort_stats('cumulative').print_stats()

결과

range(1, 100)

Fri Dec 01 14:00:29 2006    tmp.prof

         212 function calls in 0.017 CPU seconds

   Ordered by: cumulative time

   ncalls  tottime  percall  cumtime  percall filename:lineno(function)
        1    0.001    0.001    0.017    0.017 profile:0(doit())
        1    0.000    0.000    0.015    0.015 <string>:1(?)
        1    0.000    0.000    0.015    0.015 C:\speedtest2.py:35(doit)
        1    0.014    0.014    0.014    0.014 C:\speedtest2.py:23(using_izip)
        1    0.000    0.000    0.001    0.001 C:\speedtest2.py:26(using_gen)
        1    0.000    0.000    0.001    0.001 C:\speedtest2.py:10(using_loop)
        1    0.000    0.000    0.000    0.000 :0(setprofile)
       99    0.000    0.000    0.000    0.000 C:\speedtest2.py:28(intervals)
       98    0.000    0.000    0.000    0.000 :0(append)
        1    0.000    0.000    0.000    0.000 C:\speedtest2.py:17(using_map)
        1    0.000    0.000    0.000    0.000 C:\speedtest2.py:20(using_zip)
        1    0.000    0.000    0.000    0.000 :0(map)
        2    0.000    0.000    0.000    0.000 :0(range)
        1    0.000    0.000    0.000    0.000 :0(zip)
        1    0.000    0.000    0.000    0.000 :0(iter)
        1    0.000    0.000    0.000    0.000 :0(len)
        0    0.000             0.000          profile:0(profiler)

zip() - map() - for loop - generator - izip() 순으로 빠르다.

range(1, 10000)

Fri Dec 01 13:57:18 2006    tmp.prof

         20012 function calls in 0.157 CPU seconds

   Ordered by: cumulative time

   ncalls  tottime  percall  cumtime  percall filename:lineno(function)
        1    0.000    0.000    0.157    0.157 profile:0(doit())
        1    0.000    0.000    0.156    0.156 <string>:1(?)
        1    0.003    0.003    0.156    0.156 C:\speedtest2.py:35(doit)
        1    0.047    0.047    0.075    0.075 C:\speedtest2.py:10(using_loop)
        1    0.032    0.032    0.067    0.067 C:\speedtest2.py:26(using_gen)
     9999    0.035    0.000    0.035    0.000 C:\speedtest2.py:28(intervals)
     9998    0.028    0.000    0.028    0.000 :0(append)
        1    0.004    0.004    0.004    0.004 C:\speedtest2.py:23(using_izip)
        1    0.000    0.000    0.003    0.003 C:\speedtest2.py:17(using_map)
        1    0.003    0.003    0.003    0.003 :0(map)
        1    0.000    0.000    0.003    0.003 C:\speedtest2.py:20(using_zip)
        1    0.003    0.003    0.003    0.003 :0(zip)
        1    0.001    0.001    0.001    0.001 :0(setprofile)
        2    0.001    0.000    0.001    0.000 :0(range)
        1    0.000    0.000    0.000    0.000 :0(iter)
        1    0.000    0.000    0.000    0.000 :0(len)
        0    0.000             0.000          profile:0(profiler)

zip() - map() - izip() - generator - for loop 순으로 빠르다.

range(1, 1000000)

Fri Dec 01 13:55:11 2006    tmp.prof

         2000012 function calls in 22.758 CPU seconds

   Ordered by: cumulative time

   ncalls  tottime  percall  cumtime  percall filename:lineno(function)
        1    0.000    0.000   22.758   22.758 profile:0(doit())
        1    0.020    0.020   22.757   22.757 <string>:1(?)
        1    0.299    0.299   22.737   22.737 C:\speedtest2.py:35(doit)
        1    5.855    5.855    8.752    8.752 C:\speedtest2.py:10(using_loop)
        1    3.322    3.322    7.997    7.997 C:\speedtest2.py:26(using_gen)
   999999    4.675    0.000    4.675    0.000 C:\speedtest2.py:28(intervals)
   999998    2.862    0.000    2.862    0.000 :0(append)
        1    0.065    0.065    2.213    2.213 C:\speedtest2.py:17(using_map)
        1    2.148    2.148    2.148    2.148 :0(map)
        1    0.033    0.033    1.893    1.893 C:\speedtest2.py:20(using_zip)
        1    1.860    1.860    1.860    1.860 :0(zip)
        1    1.549    1.549    1.549    1.549 C:\speedtest2.py:23(using_izip)
        2    0.070    0.035    0.070    0.035 :0(range)
        1    0.001    0.001    0.001    0.001 :0(setprofile)
        1    0.000    0.000    0.000    0.000 :0(iter)
        1    0.000    0.000    0.000    0.000 :0(len)
        0    0.000             0.000          profile:0(profiler)

izip() - zip() - map() - generator - for loop 순으로 빠르다.

2006년 11월 27일

Vista 개발 관련 링크들

vista 관련 자료 저장용

Complete list of Windows Vista API changes

New_Windows_Vista_APIs.zip

  • http://devreadiness.org/files/5/white_papers/entry137.aspx
  • http://devreadiness.org/files/137/download.aspx

Microsoft Windows Vista Compatibility Document

ISV_Windows_Vista_Compatibility_cookbook.zip

  • http://devreadiness.org/files/5/white_papers/entry10.aspx

Vista compatibility investigation guide

  • http://devreadiness.org/files/5/white_papers/entry125.aspx

Windows Vista UAC Development Requirements

  • http://devreadiness.org/files/5/white_papers/entry158.aspx

Application testing guidelines for Windows Vista

  • http://devreadiness.org/files/5/presentations/entry131.aspx

Windows Vista Backup and Application Compatibility

  • http://devreadiness.org/files/5/white_papers/entry157.aspx

Links

  • http://blogs.msdn.com/vistacompatteam/default.aspx

2006년 11월 21일

Python/list 합치는 여러가지 방법

코드

#!/usr/bin/python
# -*- coding: utf-8 -*-

SRCLIST = range(1, 10)

# map을 이용하는 방법
print map(None, SRCLIST[:-1], SRCLIST[1:])

# built-in zip() 을 사용하는 방법
print zip(SRCLIST, SRCLIST[1:])

# itertools를 사용하는 방법
from itertools import izip, islice
print [(x, y) for x, y in izip(SRCLIST, islice(SRCLIST, 1, None))]

# generator를 사용하는 방법
def intervals(it):
    it = iter(it)
    st = it.next()
    for en in it:
        yield (st, en)
        st = en

print [interval for interval in intervals(SRCLIST)]

결과

[(1, 2), (2, 3), (3, 4), (4, 5), (5, 6), (6, 7), (7, 8), (8, 9)]
[(1, 2), (2, 3), (3, 4), (4, 5), (5, 6), (6, 7), (7, 8), (8, 9)]
[(1, 2), (2, 3), (3, 4), (4, 5), (5, 6), (6, 7), (7, 8), (8, 9)]
[(1, 2), (2, 3), (3, 4), (4, 5), (5, 6), (6, 7), (7, 8), (8, 9)]

2006년 11월 17일

graffiti2를 graffiti1로 변경

Palm T5의 graffiti2를 graffiti1로 변경하고 KOSPI 에서 인식 엔진을 system으로 변경하니 예전 Palm에서 사용하던 속도 그대로 나온다.

graffiti2를 graffiti1으로 변경하는 방법은 http://www.palminfocenter.com/view_story.asp?ID=5830 에 나와있다.

2006년 11월 16일

cygwin

설정 내용

~/.inputrc

set meta-flag on
set convert-meta off
set output-meta on
set completion-ignore-case on
set horizontal-scroll-mode on
set show-all-if-ambiguous on

~/.bashrc

alias ls='ls --show-control-chars -F --color=tty'
export PS1='\u@\h\w\$ '

rxvt 사용

아래와 같은 batch file을 작성한다.

@echo off

C:
chdir \cygwin\bin

set CYGWIN=tty

rxvt -tn xterm -rv -fn fixedsys -e /bin/bash --login -i

MingW로 build

link 옵션에 아래 내용 추가

--target=i686-pc-mingw32 -mno-cygwin

gcc 3.4.4 버그

cygwin/gcc 3.4.4 에서는 -mno-cygwin 옵션을 주면 링크 에러가 난다. 해결책은 아래 링크에 있다

http://www.hotsolder.com/labels/cygwin.html

만일을 위해 일부를 발췌해 놓는다.

1) In /usr/lib/gcc there is a directory for i686-pc-mingw32/3.4.4. In that directory, the Cygwin installer put ordinary .lnk files linking back to /usr/lib/gcc/i686-pc-cygwin/3.4.4. None of these work, so the first step is to make hard or symbolic links to the correct files. For example, cc1.exe.lnk needs to be fixed (from the i686-pc-mingw32/3.4.4 directory):
ln ../i686-pc-cygwin/cc1.exe cc1.exe
Fix all the links in this way. Now gcc will run with -mno-cygwin, but it still won't link. 2) The problem is, gcc is a driver and the specs file is broken. In the same directory, edit the file named specs. The trick here is we need to change the references to crt2.o to refer to a specific path (/usr/lib/mingw/crt2.0). We also need to add -L/usr/lib/mingw to several places. Here's a diff between the standard specs file and mine (significant additions in red):
$ diff specs ../../i686-pc-cygwin/3.4.4/specs
51c51
<   %{pg:-lgmon}   %{!mno-cygwin:-lcygwin}   %{mno-cygwin:%{mthreads:-lmingwthrd -L/usr/lib/mingw} -lmingw32}   %{mwindows:-lgdi32 -lcomdlg32}   -luser32 -lkernel32 -ladvapi32 -lshell32
---
>   %{pg:-lgmon}   %{!mno-cygwin:-lcygwin}   %{mno-cygwin:%{mthreads:-lmingwthrd} -lmingw32}   %{mwindows:-lgdi32 -lcomdlg32}   -luser32 -lkernel32 -ladvapi32 -lshell32
54c54
< %{mno-cygwin: %{mthreads:-lmingwthrd} -lmingw32} -lgcc           %{mno-cygwin:-lmoldname -lmingwex -lmsvcrt -L/usr/lib/mingw}
---
> %{mno-cygwin: %{mthreads:-lmingwthrd} -lmingw32} -lgcc           %{mno-cygwin:-lmoldname -lmingwex -lmsvcrt}
57c57
<   %{shared|mdll: %{mno-cygwin:dllcrt2%O%s}}  %{!shared: %{!mdll: %{!mno-cygwin:crt0%O%s} %{mno-cygwin:/usr/lib/mingw/crt2%O%s} %{mno-cygwin:-L/usr/lib/mingw}  %{pg:gcrt0%O%s}}}
---
>   %{shared|mdll: %{mno-cygwin:dllcrt2%O%s}}  %{!shared: %{!mdll: %{!mno-cygwin:crt0%O%s} %{mno-cygwin:crt2%O%s}  %{pg:gcrt0%O%s}}}

Running a native win32 application from cygwin/bash

http://hermitte.free.fr/cygwin/#Win32

2006년 11월 15일

공인인증서를 이용해서 openssh키 생성하기

공인 인증서를 이용해서 openssh 에서 사용 가능한 rsa 키를 생성하는 방법을 설명한다.

테스트 시스템은 Debian 이다.

  1. 인증서를 "내보내기" 기능을 이용해 저장한다. 저장하면 확장자가 .p12인 파일이 생긴다. 여기서는 mykey.p12 로 내보내었다고 가정한다.
  2. openssl을 이용해서 인증서를 변환한다.
    $ openssl pkcs12 -out id_rsa -in mykey.p12
    Enter Import Password : 인증서 내보내기 할 때 사용한 비밀번호
    MAC verified OK
    Enter PEM pass phrase: 키에 설정할 비밀번호
    Verifying - Enter PEM pass phrase: 위 비밀번호 반복
    
  3. 생성된 id_rsa~/.ssh 폴더로 이동한다.
    $ mv id_rsa ~/.ssh/
    
  4. 아래와 같은 명령어를 입력해서 permission을 변경한다.
    $ chmod 0600 ~/.ssh/id_rsa
    
  5. 이제 접속하고 싶은 서버의 ~/.ssh/authorized_keys2에 공개키를 등록하면 된다. 공개키는 아래와 같은 명령으로 얻을 수 있다.
    $ ssh-keygen -y -f ~/.ssh/id_rsa
    
  6. 이제부터 ssh를 이용해 접속하면 생성된 id_rsa 를 이용해 접속하게 된다.

2006년 11월 2일

Python/type 검사

isinstance(obj, typename)

예제

l = range(1, 20)
if isinstance(l, list):
    print 'list'
else:
    print 'not list'

2006년 10월 25일

Python/Opera 설정 백업 스크립트

여러 PC를 쓰다보면 Opera 설정을 동일하게 맞추기 위해서 설정 파일들을 수집해야 한다. 이 스크립트는 설치된 PC에서 Opera 설정파일을 수집하기 위해서 제작되었다.

사용법

fetchOperaSetting.py zip 파일명

변경 내역

  • 2006-10-25 0.0.2 Yun-yong Choi
  • 노트장, 쿠키, 주소록, 암호관리자 를 추가 수집
  • 사용자 css 파일 수집
  • 2006-10-24 0.0.1 Yun-yong Choi
  • first release

todo

  • OS/X 지원
  • Widget 등 나머지 설정 수집
  • 압축 파일을 원하는 계정으로 복원 해주는 기능
  • source

    #!/usr/bin/python
    # -*- coding: utf-8 -*-
    #   @brief  Opera 설정을 백업하는 script
    import os
    import sys
    import dircache
    import zipfile
    
    
    ##  @brief  사용방법을 출력한다.
    def printUsing():
        print sys.argv[0], ''
    
    if len(sys.argv) < 2:
        printUsing()
        sys.exit(1)
    
    zipname = sys.argv[1]
    
    # 현재 사용자의 profile folder를 구한다.
    homeenv = 'USERPROFILE' if sys.platform == 'win32' else 'HOME'
    
    # opera 설정 파일이 저장된 폴더
    operaprofile = '.opera' + os.path.sep if sys.platform == 'win32' else 'Application Data' + os.path.sep + 'Opera' + os.path.sep + 'Opera' + os.path.sep + 'Profile' + os.path.sep
    
    homepath = os.getenv(homeenv)
    
    # 실제 오페라 설정이 저장된 폴더
    myopera = homepath + os.path.sep + operaprofile
    
    # myopera 하부에서 수집할 폴더들
    subfolders = [
        'menu',  # 메뉴
        'mouse',  # 마우스 제스쳐
        'keyboard',  # 키보드
        'toolbar',  # 도구 모음
        'styles' + os.path.sep + 'user',  # 사용자 CSS
    ]
    subfolders = map(lambda x: myopera + x + os.path.sep, subfolders)
    
    # myopera 하부에서 수집할 파일들
    files = [
        'opera6.ini',       # opera 설정파일
        'urlfilter.ini',    # 컨텐트 차단 파일
        'ua.ini',
        'search.ini',       # 검색 환경
        'override_downloaded.ini',
        'opera6.adr',       # 북마크
        'notes.adr',        # 노트장
        'contacts.adr',     # 주소록
        'cookies4.dat',     # 쿠기
        'wand.dat',         # 암호관리자
        'opcacrt6.dat',     # 인증서
        'opcert6.dat',      # 인증서
        'opssl6.dat',       # 인증서
    ]
    files = map(lambda x: myopera + x, files)
    
    # User Script 설정이 있는지 확인하고 있으면 해당 폴더를 수집해야 한다.
    # 오페라의 ini는 정상적인 ini 형식이 아니기 때문에 ConfigParser를 사용할 수 없다.
    userjs = ''
    with file(files[0], 'rt') as f:
        for line in f:
            idx = line.find('User JavaScript File=')
            if idx == 0:
                userjs = line[len('User JavaScript File='):].rstrip('\r\n')
                break
        f.close()
    
    if userjs[-1] != os.path.sep:
        userjs = userjs + os.path.sep
    
    # 파일 수집
    subfiles = []
    for subfolder in subfolders:
        a = dircache.listdir(subfolder)
        if len(a) > 0:
            a = a[:]
            for file in a:
                subfiles.append(subfolder + file)
    
    # subfiles 와 subfolder를 수집하면 된다.
    # zip 파일 생성
    with zipfile.ZipFile(zipname, 'w', zipfile.ZIP_DEFLATED) as zipf:
        # opera 파일들
        for file in files:
            if os.path.isfile(file):
                compname = file.replace(myopera, '')
                zipf.write(file, compname)
        # sub folder에 있는 파일들
        for file in subfiles:
            if os.path.isfile(file):
                compname = file.replace(myopera, '')
                zipf.write(file, compname)
        userjsfiles = []
        # userjs 수집
        if len(userjs) > 0:
            a = dircache.listdir(userjs)
            a = a[:]
            if len(a) > 0:
                a = a[:]
                for file in a:
                    userjsfiles.append(userjs + file)
        for file in userjsfiles:
            # remove drive letter
            if os.path.isfile(file):
                compname = file
                if sys.platform == 'win32' and file[1] == ':':
                    compname = file[3:]
                zipf.write(file, compname)
    
    ##  @mainpage   fetch opera settings
    #   @version    0.0.2
    #   @section    intro_sec   소개
    # Opera의 설정파일을 수집한다.
    #   @section    requ_sec   요구사항
    #       - Windows 2000 이상의 OS
    #       - python 2.4 또는 이상 버전
    #   @section    install_sec 설치
    #       - 압축파일을 적당한 폴더에 푼다.
    #   @section    using_sec   사용방법
    #   @verbatim
    #fetchOperaSetting.py [저장할 파일이름]@endverbatim
    #   예)
    #   @verbatim
    #fetchOperaSetting.py MyOperaSetting.zip@endverbatim
    #
    #   @todo
    #       - OS/X 지원
    #       - Widget 등 나머지 설정 수집
    #       - 압축 파일을 원하는 계정으로 복원 해주는 기능
    #
    #   @since
    #       - 2006-10-25 0.0.2
    #           - 노트장, 쿠키, 주소록, 암호관리자 를 추가 수집
    #           - 사용자 css 파일 수집
    #       - 2006-10-24 0.0.1
    #           - first release
    
    ##  @brief  프로그램 버전
    VERSION = '0.0.2'

2006년 10월 24일

Opera 브라우저

소개

독자적인 html 렌더링 엔진을 가지는 브라우저. Internet Explorer 나 Firefox 보다 훨씬 빠르다.

설치 파일은 http://opera.com 에서 무료로 받을 수 있다.

Opera에서 기능 확장은 Firefox와는 다르게 User Script(Firefox의 Greasemonkey 와 같은 개념)와 설정 파일(ini 포맷) 수정으로 이루어진다.

User Script

대부분 User Script는 http://userjs.org 에서 구할 수 있다.

script를 적당한 폴더에 저장한 다음 도구 - 환경설정 - 고급 - 컨텐트 - JavaScript 옵션 에서 사용자 JavaScript 폴더 에 script를 저장한 폴더를 지정하면 된다.

이때 여러 폴더를 지정해야 하면 세미콜론(;)을 사용하면 되고, 파일 이름을 직접 입력할 수도 있다.

c:\foo\bar\haha.js;c:\myscript
Extra download links페이지 안의 이미지나 기타 object를 다운 받기 쉽게 패널에 링크에 표시해준다.(ctrl + j 로도 확인 가능)
Operadepia구글 검색 결과에 Wikidepia 검색 결과를 보여준다
Google image frame bypasser구글 이미지 검색 결과에서 이미지를 클릭하면 해당 이미지만 표시해준다.
Flash block for OperaFirefox의 flash block 확장처럼 flash 실행을 막아준다.

Menu 수정

수정하기 전에 기본 메뉴 파일opera 설치 폴더에서 menu.iniprofile 폴더로 복사해서 사용한다.

profile 폴더위치는 OS 별로 다르다.

  • Windows
    %USERPROFILE%\Application Data\Opera\Opera\profile\menu
  • Unix
    ~/.opera/menu
  • OS/X
    ~/Library/Preferences/Opera\ Preferences/menu/

편집시 항상 Opera를 종료한 상태에서 해야 하며 menu.ini 처음을 아래처럼 바꾼다.

[Version]
File Version=적당한숫자

[Info]
Name=오페라 메뉴에서 나타나는 이름
Description=메뉴설명
Author=작성자
Version=적당한숫자

opera에서 사용하는 ini 파일은 utf-8 형식으로 저장해야 한다.

메뉴를 저장한 후 Opera를 실행해서 도구 - 환경설정 - 고급 - 도구모음을 선택하면 아래 그림과 같은 화면이 뜬다.

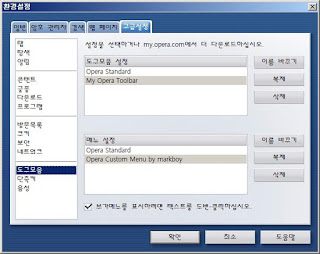
여기에서 위 Description에 적은 내용과 동일한 메뉴를 선택해주면 된다.

User Script 기능 on/off

[Quick Preferences Menu]
Item, "사용자 JavaScript 사용"	= Set preference, "User Prefs|User JavaScript=1" | Set preference, "User Prefs|User JavaScript=0"

현재 페이지를 번역하기

아래 section에 내용을 추가한다.

[Document Popup Menu]
Submenu, "현재 페이지를 번역하기", Translations Menu
Item, "자동번역"="Go to page, "http://translate.google.co.kr/translate_c?u=%u""
--------------------1
Item, "일본어를 한국어로"="Go to page, "http://translate.google.co.kr/translate?u=%u&sl=ja&tl=ko&hl=ko&ie=UTF-8""
Item, "영어를 한국어로"="Go to page, "http://translate.google.co.kr/translate?u=%u&sl=en&tl=ko&hl=ko&ie=UTF-8""
--------------------2
Item, "한국어를 영어로"="Go to page, "http://translate.google.co.kr/translate?u=%u&sl=ko&tl=en&hl=ko&ie=UTF-8""
Item, "한국어를 일본어로"="Go to page, "http://translate.google.co.kr/translate?u=%u&sl=ko&tl=ja&hl=ko&ie=UTF-8""
Item, "한국어를 중국어(간체)로"="Go to page, "http://translate.google.co.kr/translate?u=%u&sl=ko&tl=zh-CN&hl=ko&ie=UTF-8""
Item, "한국어를 중국어(번체)로"="Go to page, "http://translate.google.co.kr/translate?u=%u&sl=ko&tl=zh-TW&hl=ko&ie=UTF-8""
--------------------3
Item, "일본어를 영어로"="Go to page, "http://translate.google.co.kr/translate?u=%u&sl=ja&tl=en&hl=ko&ie=UTF-8""

핫 클릭 팝업 메뉴의 번역 메뉴에 구글 번역 추가

아래 section에 내용을 추가한다.

[Translate menu]
--------------------7
Item, "자동번역"="Go to page, "http://translate.google.co.kr/?hl=ko#auto|ko|%t""
--------------------8
Item, "일본어를 한국어로"="Go to page, "http://translate.google.co.kr/?hl=ko#ja|ko|%t""
Item, "영어를 한국어로"="Go to page, "http://translate.google.co.kr/?hl=ko#en|ko|%t""
--------------------9
Item, "한국어를 영어로"="Go to page, "http://translate.google.co.kr/?hl=ko#ko|en|%t""
Item, "한국어를 일본어로"="Go to page, "http://translate.google.co.kr/?hl=ko#ko|ja|%t""
Item, "한국어를 중국어(간체)로"="Go to page, "http://translate.google.co.kr/?hl=ko#ko|zh-CN|%t""
Item, "한국어를 중국어(번체)로"="Go to page, "http://translate.google.co.kr/?hl=ko#ko|zh-TW|%t""
--------------------10
Item, "일본어를 영어로"="Go to page, "http://translate.google.co.kr/?hl=ko#ja|en|%t""

툴바 버튼 추가

http://operawiki.info/CustomButtons 등의 사이트에서 버튼을 클릭하면 커스텀 버튼이 등록된다.

직접 toolbar.ini를 편집해도 된다.

[Customize Toolbar Custom.content]
Button0, 749810497="Enable menu bar, , , 749810497, "Menu" | Disable menu bar, , , , "749810497" + Show popup menu, "Browser Menu Bar""
Button1, 278263762=Leave fullscreen, , , "FullScreen", "Enter Fullscreen" > Enter fullscreen & Set alignment, "document toolbar", 2 & Enable scroll bars & Set alignment, "pagebar", 2
Button2, "Validate"="Go to page, "http://validator.w3.org/check?uri=%u", , "Validate", "Select user mode""
Button3, "Validate CSS"="Go to page, "http://jigsaw.w3.org/css-validator/validator?uri=%u&warning=1&profile=css2", , "Validate CSS", "Select user mode""

속도 향상

아래 내용은 주소 창에 opera:config를 입력한 후 나오는 설정 창에서 해당 값을 찾아 수정한다.

Network 관련 수정

HTTP Error Strategy: 2
Max Connections Server: 16
Max Connections Total: 64
Network Buffer Size: 32
No Connection Keepalive: False
Non-Compliant Server 100 Continue: False
Reduce Max Persistent HTTP Connections: False
Synchronous DNS Lookup: False

큰 이미지가 있는 사이트에서 느려질때

Turbo Mode: False

favicon 사용하지 않게 수정

alway load favison: 0

2006년 10월 5일

Debian/ATI 드라이버 설치

package 설치

# apt-get install fglrx-control
# apt-get install fglrx-driver
# apt-get install fglrx-kernel-src module-assistant

커널 모듈 컴파일

# module-assistant prepare
# module-assistant update
# module-assistant a-i fglrx

설치

컴파일이 끝나면 /usr/src/fglrx-kernel-커널버전-*.deb 파일이 생긴다.

이 파일을 설치하면 된다.

# dpkg -i /usr/src/fglrx-kernel-커널버전-*.deb

X.org 설정

aticonfig 툴을 이용해 설정한다.

Reference

http://wiki.cchtml.com/index.php/Debian_Installation_Guide

2006년 8월 3일

Moniwiki/로그인 사용자만 접근 가능한 페이지 설정

private/으로 시작하는 페이지는 로그인한 사용자만 접근하게 수정하는 방법을 기술한다.

wiki.php 수정

if ($DBInfo->control_read and !$DBInfo->security->is_allowed('read',$options))

이 줄을 찾아서 아래처럼 수정한다.

if (!$DBInfo->security->is_allowed('read',$options))

Security plugin 수정

사용중인 security pluin을 찾아서 아래 함수를 추가한다.

  function may_read($action,$options) {
    return 1;
  }

is_allow() 함수 를 아래처럼 수정한다.

  function is_allowed($action="read",$options) {
    if (eregi('private/',$options['page']))
    {
      if ($options['id'] == 'Anonymous') {
        $options['err']=sprintf(_("You are not allowed to '%s' on this page."),$action);
        return 0;
      }
    }

2006년 7월 25일

Notepad Conspiracy Claim

메모장을 열어서

Bush hid the facts

라고 입력한 다음 저장해서 다시 메모장으로 열어보면 전혀 엉뚱한 글자가 보인다.

이 현상에 대한 내용은 아래 링크에 있다.

http://www.hoax-slayer.com/bush-hid-the-facts-notepad.html

요약하면 메모장에서 Ansi-Unicode를 판단하는 알고리즘의 버그? 를 이용한 장난이다.

실제로 저장된 파일을 vi 같은 에디터로 열어보면 입력한 글자들이 잘 보인다.

2006년 4월 25일

Debugging/Map파일 해석

Visual C++ 설정을 제대로 맞추었다면 빌드시 map파일이 생성된다.

최악의 경우 map파일만을 사용해서 문제 원인을 파악해야 하는데 map파일 해석 방법을 알아두면 유용하다.

예제 소스

우선 아래와 같은 프로그램이 있다고 하면

// HelloMap.cpp : Defines the entry point for the console application.
//

#include "stdafx.h"

const char *HELLO = "Hello, World";

void foo()
{
	for (int i = 0; i < 10; i++)
	{
		printf("%d\n", i);
	}
}

void bar(int x)
{
	char *buf = const_cast<char *>(HELLO);

	buf[0] = 'K';

	for (int i = 0; i < x; i++)
	{
		printf("%d\n", i);
	}

	printf("%s", buf);

	foo();
}

int main(int argc, char* argv[])
{
	printf("%s!\n", HELLO);
	bar(20);
	return 0;
}

예제에서 생성된 map

생성된 map파일의 예는 아래와 같다.

 HelloMap

 Timestamp is 444e24fb (Tue Apr 25 22:32:43 2006)

 Preferred load address is 00400000

 Start         Length     Name                   Class
 0001:00000000 00000232H .text                   CODE
 0002:00000000 00000044H .idata$5                DATA
 0002:00000048 00000054H .rdata                  DATA
 0002:0000009c 00000014H .idata$2                DATA
 0002:000000b0 00000014H .idata$3                DATA
 0002:000000c4 00000044H .idata$4                DATA
 0002:00000108 000000eeH .idata$6                DATA
 0002:000001f6 00000000H .edata                  DATA
 0003:00000000 00000004H .CRT$XCA                DATA
 0003:00000004 00000004H .CRT$XCZ                DATA
 0003:00000008 00000004H .CRT$XIA                DATA
 0003:0000000c 00000004H .CRT$XIZ                DATA
 0003:00000010 00000010H .data                   DATA
 0003:00000020 0000001cH .bss                    DATA

  Address         Publics by Value              Rva+Base     Lib:Object

 0001:00000000       ?foo@@YAXXZ                00401000 f   HelloMap.obj
 0001:00000019       ?bar@@YAXH@Z               00401019 f   HelloMap.obj
 0001:00000057       _main                      00401057 f   HelloMap.obj
 0001:00000076       _printf                    00401076 f   MSVCRT:MSVCRT.dll
 0001:0000007c       _mainCRTStartup            0040107c f   MSVCRT:crtexe.obj
 0001:0000018c       __exit                     0040118c f   MSVCRT:MSVCRT.dll
 0001:00000192       __XcptFilter               00401192 f   MSVCRT:MSVCRT.dll
 0001:00000198       _exit                      00401198 f   MSVCRT:MSVCRT.dll
 0001:0000019e       ___p___initenv             0040119e f   MSVCRT:MSVCRT.dll
 0001:000001a4       ___getmainargs             004011a4 f   MSVCRT:MSVCRT.dll
 0001:000001aa       __initterm                 004011aa f   MSVCRT:MSVCRT.dll
 0001:000001b0       __setdefaultprecision      004011b0 f   MSVCRT:fp8.obj
 0001:000001c2       ___setusermatherr          004011c2 f   MSVCRT:MSVCRT.dll
 0001:000001c8       __matherr                  004011c8 f   MSVCRT:merr.obj
 0001:000001cb       __setargv                  004011cb f   MSVCRT:dllargv.obj
 0001:000001cc       ___p__commode              004011cc f   MSVCRT:MSVCRT.dll
 0001:000001d2       ___p__fmode                004011d2 f   MSVCRT:MSVCRT.dll
 0001:000001d8       __onexit                   004011d8 f   MSVCRT:atonexit.obj
 0001:00000204       _atexit                    00401204 f   MSVCRT:atonexit.obj
 0001:00000216       ___set_app_type            00401216 f   MSVCRT:MSVCRT.dll
 0001:00000220       __except_handler3          00401220 f   MSVCRT:MSVCRT.dll
 0001:00000226       __controlfp                00401226 f   MSVCRT:MSVCRT.dll
 0001:0000022c       ___dllonexit               0040122c f   MSVCRT:MSVCRT.dll
 0002:00000000       __imp__printf              00402000     MSVCRT:MSVCRT.dll
 0002:00000004       __imp___exit               00402004     MSVCRT:MSVCRT.dll
 0002:00000008       __imp___XcptFilter         00402008     MSVCRT:MSVCRT.dll
 0002:0000000c       __imp__exit                0040200c     MSVCRT:MSVCRT.dll
 0002:00000010       __imp____p___initenv       00402010     MSVCRT:MSVCRT.dll
 0002:00000014       __imp____getmainargs       00402014     MSVCRT:MSVCRT.dll
 0002:00000018       __imp___initterm           00402018     MSVCRT:MSVCRT.dll
 0002:0000001c       __imp____setusermatherr    0040201c     MSVCRT:MSVCRT.dll
 0002:00000020       __imp___adjust_fdiv        00402020     MSVCRT:MSVCRT.dll
 0002:00000024       __imp____p__commode        00402024     MSVCRT:MSVCRT.dll
 0002:00000028       __imp____p__fmode          00402028     MSVCRT:MSVCRT.dll
 0002:0000002c       __imp____set_app_type      0040202c     MSVCRT:MSVCRT.dll
 0002:00000030       __imp___except_handler3    00402030     MSVCRT:MSVCRT.dll
 0002:00000034       __imp___controlfp          00402034     MSVCRT:MSVCRT.dll
 0002:00000038       __imp____dllonexit         00402038     MSVCRT:MSVCRT.dll
 0002:0000003c       __imp___onexit             0040203c     MSVCRT:MSVCRT.dll
 0002:00000040       \177MSVCRT_NULL_THUNK_DATA 00402040     MSVCRT:MSVCRT.dll
 0002:0000006c       ??_C@_0N@PLDO@Hello?0?5World?$AA@ 0040206c     HelloMap.obj
 0002:0000007c       ??_C@_03HMFC@?$CFd?6?$AA@  0040207c     HelloMap.obj
 0002:00000080       ??_C@_02DILL@?$CFs?$AA@    00402080     HelloMap.obj
 0002:00000084       ??_C@_04MIBI@?$CFs?$CB?6?$AA@ 00402084     HelloMap.obj
 0002:0000009c       __IMPORT_DESCRIPTOR_MSVCRT 0040209c     MSVCRT:MSVCRT.dll
 0002:000000b0       __NULL_IMPORT_DESCRIPTOR   004020b0     MSVCRT:MSVCRT.dll
 0003:00000000       ___xc_a                    00403000     MSVCRT:cinitexe.obj
 0003:00000004       ___xc_z                    00403004     MSVCRT:cinitexe.obj
 0003:00000008       ___xi_a                    00403008     MSVCRT:cinitexe.obj
 0003:0000000c       ___xi_z                    0040300c     MSVCRT:cinitexe.obj
 0003:00000010       ?HELLO@@3PBDB              00403010     HelloMap.obj
 0003:00000014       ___defaultmatherr          00403014     MSVCRT:merr.obj
 0003:00000020       __dowildcard               00403020     MSVCRT:wildcard.obj
 0003:00000024       __newmode                  00403024     MSVCRT:_newmode.obj
 0003:00000028       __commode                  00403028     MSVCRT:xncommod.obj
 0003:0000002c       __fmode                    0040302c     MSVCRT:xtxtmode.obj
 0003:00000030       ___onexitend               00403030     <common>
 0003:00000034       ___onexitbegin             00403034     <common>
 0003:00000038       __adjust_fdiv              00403038     <common>

 entry point at        0001:0000007c

 Static symbols


Line numbers for .\Release\HelloMap.obj(D:\MyData\My Projectz\SDK\HelloMap\HelloMap.cpp) segment .text

     9 0001:00000000    12 0001:00000003    14 0001:00000018    17 0001:00000019
    24 0001:00000033    27 0001:00000044    29 0001:0000004e    30 0001:00000056
    33 0001:00000057    35 0001:00000068    36 0001:00000072    37 0001:00000074

map 해석

crash 주소 찾기

이 프로그램을 실행하면 그대로 crash가 일어난다.

프로그램이 crash가 일어났을 경우 crash가 발생한 주소를 얻을 수 있다. 주소를 확인해보면 아래와 같다.

crash가 발생한 함수 찾기

map파일에서 0x40102e 보다 주소가 뒤에 있는(rvs+base가 큰) 함수를 찾는다. _main이다.

그렇다면 에러는 바로 전 함수인 ?bar@@YAXH@Z 함수에서 발생되었다. 우선 함수 이름을 알아보자. Visual C++에 있는 UNDNAME.exe 프로그램을 사용한다.

C:\Program Files\Microsoft Visual Studio\Common\Tools>undname ?bar@@YAXH@Z
Microsoft(R) Windows NT(R) Operating System
UNDNAME Version 5.00.1768.1Copyright (C) Microsoft Corp. 1981-1998

>> ?bar@@YAXH@Z == bar

crash가 발생한 함수는 bar 함수이다.

source와 line 번호 찾기

이제 line 번호를 찾자. map 파일에서 line 번호는 아래와 같은 형식으로 되어있다.

9 0001:00000000

맨 앞이 line 번호, 뒤가 offset 정보다. 오류가 발생한 주소로 offset 정보를 계산하면 아래와 같다.

offset = 오류주소 - preferred load address - 0x1000

이같은 식으로 계산하면 40102e - 400000 - 1000 = 2e 가 되며 2e가 offset이 된다.

bar함수의 object 이름은 HelloMap.obj 이므로 눈치상 HelloMap.cpp에 속한 함수라는것을 알 수 있다.

map 파일의 HelloMap.cpp line 정보에 나와있는 offset 중에서 2e근처의 값을 찾는다. 여기서 주의할점은 작은 값을 찾아야 한다.

17 0001:00000019

19가 가장 근접한 값이다. 즉 bar 함수는 HelloMap.cpp의 19번째 줄부터 시작한다.

With WinDbg

WinDbg를 이용해 프로그램을 실행해보자.

esi가 가리키는 주소에 값을 쓰려다 AV가 발생했다. esi에 어떤 값이 있는지 register를 확인해보자.

esi는 언제 설정되었는지 보기 위해서 어셈코드를 보자.

esi에 00403010 값이 그대로 대입 된다. 혹시 map파일에 뭔가 있는지 찾아보자

?HELLO@@3PBDB 라는 이름이 붙어있다. undname으로 실제 이름을 알아내면

C:\Program Files\Microsoft Visual Studio\Common\Tools>UNDNAME.EXE ?HELLO@@3PBDB
Microsoft(R) Windows NT(R) Operating System
UNDNAME Version 5.00.1768.1Copyright (C) Microsoft Corp. 1981-1998

>> ?HELLO@@3PBDB == HELLO

HELLO라는 함수가 있나? 그런데 HELLO의 Address 부분이 아까 bar 함수와 다르게 0003 으로 시작한다. HELLO의 Address인 0003:00000010 이 어느 section 인지 map파일 처음을 보면 HELLO는 .data 영역에 있다. 전역변수가 된다.

오류가 발생한 부분의 어셈을 보면 {{|mov byte ptr , 0x4b|}}, 즉 HELLO 는 전역변수이면서 포인터 변수라고 유추할 수 있다. 원래는 memory에서 0x00403010 에 저장된 4byte를 읽어와야 하지만 windbg가 그 작업까지 해줬다.

결국 0x0040206c 에 어떤 값을 저장하려다 AV가 발생했다. HELLO와 같은 방법으로 map 파일을 뒤지면 ??_C@_0N@PLDO@Hello?0?5World?$AA@ 이런 녀석이 나오고 unname을 사용해보면 string 이라고만 나온다. 즉 0040206c에 있는 값은 string literal 이라고 유추할 수 있다.

결론을 내리면 bar 함수 시작 부분에 전역 변수 HELLO가 가리키는 주소에 어떤 값을 쓰려고 하는 코드가 존재하며 HELLO가 가리키는 주소는 string literal 이기 때문에 AV가 발생한 것으로 보인다.

Debugging/VC6 설정

좀더 편한 디버깅을 위해서는 Release Build 에도 몇가지 옵션을 조정해주는 것이 좋다.

Compiler 옵션

Compiler 옵션은 Project - Settings - C/C++ 탭에서 Project Settings에 넣는다.

옵션설명
/W4경고 레벨을 최대로
/WX경고를 에러로.
/ZiPDB 생성을 위해서 넣는다.
/GFstring literal을 read only 상태로 만든다. 이 옵션 없이 빌드하면 string literal을 수정할 수 있다.

Link옵션

Linker 옵션은 Project - Settings - Link 탭에서 Project Settings에 넣는다.

옵션설명
/release /debugpdb 생성을 위해 넣는다. /debug 만 있으면 생성하지만 /release 옵션이 없으면 WinDbg에서 symbol을 맞출 때 checksum 경고를 보여주기 때문에 시간이 오래 걸린다.
/pdbtype:conpdb를 하나로 만들어준다.
/map:map파일명map파일을 생성한다. 보통 map파일이름은 <project이름>.map 이다.
/mapinfo:EXPORTSexport symbol을 표시한다.
/mapinfo:LINESline 정보를 포함한다.

2006년 4월 17일

Python/숫자 세 자리마다 콤마 찍기

간단하게

  1. 뒤에서 부터 3자리씩 끊는다.
  2. 사이사이 ','를 넣어서 합친다.

def foo(num) :
    # num을 문자열로 만들어서 뒤집는다. num이 1234이면 a는 '4321'
    a = str(num)[::-1]
    # a를 가지고 (index, a[index]) 의 iter 를 만든다.
    # 그리고  index > 0 and index % 3 == 0 일때 a[index] 뒤에 ','를 붙인 list를 만든다.
    # b = ['4', '3', '2', '1,'] 형태가 된다.
    b = [c + ',' if (i and (i % 3 == 0)) else c for i, c in enumerate(a)]
    # 뒤집어진 문자열로 작업했기 때문에 다시 뒤집는다.
    b = b[::-1]
    # 문자열로 합쳐서 결과를 돌려준다.
    return string.join(b, '').replace('-,', '-')

한줄로 정리하면

def foo2(num) :
    return string.join([c + ',' if (i and (i % 3 == 0)) else c for i, c in enumerate(str(num)[::-1])][::-1], '').replace('-,', '-')

2006년 3월 16일

파일 이름이 깨지지 않도록 HTTP Header 처리하기

opera등의 웹브라우저에서 파일 다운로드시 파일명이 깨지는 경우가 있다.

파일명에 한글이 들어가 있고 파일 직접 링크가 아니고 별도 서버 프로그램(php 등)을 통해서 다운 받는 경우 발생하는데, 서버쪽 프로그램을 수정해줘야 한다.

php 경우 아래처럼 수정해주면 된다.

<?php
$fname = "파일명";
function id_browser() {
    $browser=$_SERVER['HTTP_USER_AGENT'];

    if(ereg('Opera(/| )([0-9].[0-9]{1,2})', $browser))
    {
        return 'OPERA';
    }
    else if(ereg('MSIE ([0-9].[0-9]{1,2})', $browser))
    {
        return 'IE';
    }
    else if(ereg('OmniWeb/([0-9].[0-9]{1,2})', $browser))
    {
        return 'OMNIWEB';
    }
    else if(ereg('(Konqueror/)(.*)', $browser))
    {
        return 'KONQUEROR';
    }
    else if(ereg('Mozilla/([0-9].[0-9]{1,2})', $browser))
    {
        return 'MOZILLA';
    }
    else
    {
        return 'OTHER';
    }
}

$browser = id_browser();

$download_size = filesize($fname);
header("Content-Type: application/x-download");
if ($browser == 'IE')
{
    header("Content-Disposition: attachment; filename=" . urlencode(iconv("cp949", "utf-8", $fname)) );
}
else
{
    header("Content-Disposition: attachment; filename=" . iconv("cp949", "utf-8", $fname) );
}
header("Accept-Ranges: bytes");
header("Content-Transfer-Encoding: binary");
header("Content-Length: " . $download_size );

@readfile($fname);
?>

HTTP 헤더중 Content-Disposition: 에 파일 이름을 기술하는데 브라우저마다 인식하는 방법이 다르기 때문에 별도 처리들 해줘야 한다.

IE 경우는 utf-8 문자열을 urlencode 해줘야 하고, Opera나 Firefox 는 그냥 utf-8 로 써주면 된다.

2006년 3월 8일

Apache에서 Robot 접근 막기

평소에는 robot에 대해 무관심 했었는데 어느 날 서버 로그를 보니 MSN robot이 내 사이트 전체를 긁고 있었다. 물론 robot.txt 파일을 만들어서 robot 이 내 사이트에 접근하지 않도록 했었지만 MSN은 그 규칙을 무시하고 있었다.

그래서 처음에는 MSN의 robot만 막으려고 했지만 서버 로그를 관찰한 결과 robot.txt 는 무용지물이라고 결론내리고 apache의 rewrite 모듈을 이용해 robot을 막기로 했다.

테스트 환경

  • Debian Sarge
  • Apache 2.0

Apache 설정

Apache 2.0으로 오면서 기존에 httpd.conf 에 통합되었던 설정 파일이 여러 디렉토리로 분산 되었다.

  • 설정 파일인 /etc/apache2/apache2.conf
  • 모듈 설정 파일이 있는 /etc/apache2/mods-avaliable
  • 사용할 모듈 설정 파일이 있는 /etc/apache2/mods-enabled 실제로는 /etc/apache2/mods-avaliable 에 있는 파일을 심볼릭 링크를 걸어서 사용한다.
  • 웹사이트 설정 파일이 있는 /etc/apache2/sites-avaliable
  • 사용할 웹사이트 설정 파일이 있는 /etc/apache2/sites-avaliable 실제로는 /etc/apache2/sites-avaliable 에 있는 파일을 심볼릭 링크를 걸어서 사용한다.

rewrite 모듈 활성화

rewrite모듈을 apache가 읽도록 하기 위해서 /etc/apache2/mods-enabled 디렉토리에서 아래 명령을 실행한다.

$ ln -s ../mods-avaliable/rewrite.load

웹사이트 설정 변경

웹사이트 설정 파일을 하나 만든다(여기서는 testserver 로 한다. 기존에 사용 하던 파일이 있으면 그 파일을 수정한다).

$ cd /etc/apache2/sites-avaliable
$ vi testserver

아래와 같은 내용을 입력한다.


    ...

    # robot 막기
    RewriteEngine On
    RewriteCond %{HTTP_USER_AGENT} ^.*Slurp.* [NC,OR]
    RewriteCond %{HTTP_USER_AGENT} ^.*MMCrawler.* [NC,OR]
    RewriteCond %{HTTP_USER_AGENT} ^.*grub-client.* [NC,OR]
    RewriteCond %{HTTP_USER_AGENT} ^.*WISEbot.* [NC,OR]
    RewriteCond %{HTTP_USER_AGENT} ^.*robot.* [NC,OR]
    RewriteCond %{HTTP_USER_AGENT} ^.*Gaisbot.* [NC,OR]
    RewriteCond %{HTTP_USER_AGENT} ^.*WebRobot.* [NC,OR]
    RewriteCond %{HTTP_USER_AGENT} ^.*WebZIP.*  [NC,OR]
    RewriteCond %{HTTP_USER_AGENT} ^.*Teleport.* [NC,OR]
    RewriteCond %{HTTP_USER_AGENT} ^.*MSNBot.* [NC,OR]
    RewriteCond %{HTTP_USER_AGENT} ^.*Yahoo.* [NC,OR]
    RewriteCond %{HTTP_USER_AGENT} ^.*Naver.* [NC,OR]
    RewriteCond %{HTTP_USER_AGENT} ^.*Empas.* [NC,OR]
    RewriteCond %{HTTP_USER_AGENT} ^.*Crawler.* [NC]
    RewriteRule .* - [F,L]

    ...

설정이 끝났으면 아래 명령으로 방금 설정한 testserver 를 apache 시작 시 읽도록 한다.

$ cd /etc/apache2/sites-enabled
$ ln -s ../sites-avaliable/testserver

아파치 재 시작

$ /etc/init.d/apache2 restart

이제 웹서버 로그를 살펴보면 위에 기술된 webrobot들은 모두 403 에러(접근 금지) 를 만나게 된다.

인터넷 연결상태 알아오기


DWORD dwConnectionTypes;
if(InternetGetConnectedState(&dwConnectionTypes, 0)) // 정상적으로 검사됨
{
	if((dwConnectionTypes & INTERNET_CONNECTION_MODEM) != 0)
		printf("Internet connection using modem");

	if((dwConnectionTypes & INTERNET_CONNECTION_LAN) != 0)
		printf("Internet connection using LAN");

	if((dwConnectionTypes & INTERNET_CONNECTION_PROXY) != 0)
		printf("Internet connection using Proxy");

	if((dwConnectionTypes & INTERNET_CONNECTION_MODEM_BUSY) != 0)
		printf("Modem is busy");

	if((dwConnectionTypes & INTERNET_RAS_INSTALLED) != 0)
		printf("RAS is installed");

	if((dwConnectionTypes & INTERNET_CONNECTION_OFFLINE) != 0)
		printf("Offline");
}
else
	printf("InternetGetConnectedState() API is failed!");

파일 write시에 다른 프로세스가 접근하지 못하도록 파일을 lock

Original link

int f_lockwrite(char* szMsg, int iFileDesc)
{
	struct flock    *stFlock;
	int             n;

	stFlock = (struct flock*)malloc(sizeof(struct flock));
	stFlock->l_type = F_WRLCK;
	fcntl(iFileDesc, F_SETLKW, stFlock);
	if ((n = write(iFileDesc, szMsg, 1)) <= 0)
 	{
		return -1;
	}
	stFlock.l_type = F_UNLCK;
	fcntl(iFileDesc, F_SETLK, stFlock);
	free(stFlock);
	return 1;
}

Windows Icon Cache를 다시 생성하기

가끔 Windows Icon Cache 가 깨져서 다시 생성해야 할 필요가 있다. 보통은 icon cache 파일을 삭제후 재부팅 하거나 바탕화면 등록 정보에서 icon 크기를 바꾸면 된다.

아래 코드는 바탕화면 icon 크기를 변경시켜서 icon cache를 다시 생성하게 만드는 코드이다.

#include <atlbase.h>

/**	@brief	윈도우의 아이콘 캐쉬를 다시 빌드한다.
 *
 *	@author	Yun-yong Choi
 */
void __cdecl RebuildIconCache(void)
{
	CRegKey RegKey;		/**< registry interface */
	int OldSize = 0;	/**< 원래 shell icon 크기를 저장 */

	LRESULT lRet = RegKey.Open(HKEY_CURRENT_USER,
		"Control Panel\\Desktop\\WindowMetrics",
		KEY_ALL_ACCESS);

	if (lRet == ERROR_SUCCESS)
	{
		DWORD dwCnt;
		CHAR buf[BUFSIZ] = {0, };

		dwCnt = BUFSIZ - 1;

		lRet = RegKey.QueryValue(buf, "Shell Icon Size", &dwCnt);
		if (lRet != ERROR_SUCCESS)
		{
			RegKey.Close();
			return;
		}

		OldSize = atoi(buf);
		wsprintf(buf, "%ld", OldSize + 1);
		RegKey.SetValue(buf, "Shell Icon Size");
		SendMessage( HWND_BROADCAST, WM_SETTINGCHANGE,
			SPI_SETICONMETRICS, (LPARAM)( "WindowMetrics" ));

		if (OldSize > 0)
		{
			wsprintf(buf, "%ld", OldSize);
			RegKey.SetValue(buf, "Shell Icon Size");

			SendMessage( HWND_BROADCAST, WM_SETTINGCHANGE,
				SPI_SETICONMETRICS, (LPARAM)( "WindowMetrics" ));
		}
		else
		{
			RegKey.DeleteValue("Shell Icon Size");

			SendMessage( HWND_BROADCAST, WM_SETTINGCHANGE,
				SPI_SETICONMETRICS, (LPARAM)( "WindowMetrics" ));
		}
		RegKey.Close();
	}
}

Kernel 2.6.x에서 한/영 전환키 사용하기

커널을 수정하지 않는 방법

/etc/init.d/bootmisc.shDebian sid기준 아래와 같은 내용을 추가합니다.아래와 같은 내용을 추가합니다.

setkeycodes 71 122
setkeycodes 72 123

~/.Xmodmap 파일에 아래 내용을 추가합니다.

keycode 210 = Hangul
keycode 209 = Hangul_Hanja

X 시작시 Xmodmap파일을 읽도록 적당히 설정합니다. 내 경우에는 ~/.xsession 파일에 아래 내용을 추가했습니다.

xmodmap ~/.Xmodmap

커널을 수정하는 방법

input.c 파일을 수정해야 한다.

--- linux/drivers/input/input.c~   2004-02-11 02:50:37.000000000 +0900
+++ linux/drivers/input/input.c   2004-02-13 14:32:02.726977768 +0900
@@ -92,8 +92,11 @@

       case EV_KEY:

-         if (code > KEY_MAX || !test_bit(code, dev->keybit) || !!test_bit(code, dev->key) == value)
-            return;
+         if (code != KEY_HANGUEL && code != KEY_HANJA)
+         {
+            if (code > KEY_MAX || !test_bit(code, dev->keybit) || !!test_bit(code, dev->key) == value)
+               return;
+         }

          if (value == 2)
             break;

Debian/Tip모음

각종 그룹 설정

사운드 카드 출력 권한

# adduser user_id audio

각종 디스크 접근 권한

# adduser user_id floppy
# adduser user_id cdrom
# adduser user_id disk

Video4Linux

# adduser user_id video

log파일 읽기 권한 부여

# adduser user_id adm

/usr/src 아래 소스파일에 접근 권한 부여

# adduser user_id src

/usr/local 아래작업 권한과 /home 아래 디렉토리 만드는 권한 부여

# adduser user_id staff

serial port 접근 권한

# adduser user_id dialout

공유 설정 권한

# adduser user_id sambashare

로케일

로케일 설정

# dpkg-reconfigure locales

한글 로케일로 설정

/etc/skel/ 에 만들기

# set-language-env -E

현재 사용자의 홈 디렉에 만들기

# set-language-env -R

fat32 한국어 codepage로 mount

/etc/fstab에 아래와 같이 설정.

/dev/hda1 /mnt/win vfat noauto,iocharset=cp949,defaults 0 0

X.org

X.org에서 hal을 지원하면서 크게 수정해야 할 부분이 없어졌다.

Windows Manager 바꾸기

# update-alternative --config x-session-manager
# update-alternative --config x-window-manager

service daemon 추가 제거

제거

# update-rc.d -f xdm remove

추가

# update-rc.d xdm defaults 99 01

kernel

Debian/Kernel 패키지 만들기

mount

autofs 사용시 root 이외의 사용자가 mount 되는 파티션에 접근하기

/etc/auto.misc 파일을 아래와 같이 수정한다.

win_c  -fstype=vfat,gid=disk,umask=022 :/dev/hda1

위 설정대로 하면 /dev/hda1 파티션을 /var/autofs/misc/win_c 에 mount하고 disk 그룹 사용자가 읽기,실행 권한을 가지도록 한다.

Package 관리

패키지 목록 갱신하기

$ apt-get update

패키지 설치하기

$ apt-get install hello
$ dpkg -i hello*.deb

설치된 패키지 업그레이드하기

$ apt-get upgrade
$ apt-get dselect-upgrade

시스템 업그레이드

stable 에서 testing 이나 unstable로 시스템을 변경하고 싶을때 사용한다.

$ apt-get dist-upgrade

패키지 삭제하기

$ apt-get remove hello

패키지 설정 삭제하기

$ apt-get remove --purge hello

특정 패키지의 자세한 정보 출력하기

$ dpkg --print-avail hello
$ dpkg -p hello
$ apt-cache show hello

설치된 패키지 전체 목록 보기

$ dpkg -l

설치된 패키지 해당 파일 목록 보기

$ apt-file list hello
$ dpkg -L hello

특정 파일이 어느 패키지에 속해 있는지 보여주기

$ apt-file search foofile
$ dpkg --search foofile
$ dpkg -S foofile

패키지 소스 받기

$ apt-get source hello

패키지 소스 받아 컴파일 설치하기

$ apt-get -b source hello
$ apt-get source hello
$ apt-get build-dep less
$ cd hello-###/
$ fakeroot ./debian/rules binary

패키지 의존성 보기

$ apt-cache depends hello

패키지 역 의존성 보기

$ apt-cache rdepends hello

패키지 빌드 의존성 충족시키기

$ apt-get build-dep hello

고아 패키지 찾기

다른 패키지와 연관성이 없는 고아 패키지 검색하기.

$ deborphan

이름으로 패키지 찾기

$ apt-cache pkgnames hello

설명으로 패키지 찾기

$ apt-cache search hello

GNOME

gnome-volume-manager 사용

  • usbmount 등이 있으면 삭제
  • plugdev 그룹에 자신의 id 추가
  • fstab에서 외부 장치에 대한 부분 주석 처리. 내장 하드 에 대해서 주석 처리 했더니 권한 문제가 생겼다. 해결 방법은 아직 모른다.
  • gconf-editor를 사용해서 /system/storage/default_options 에 codepage와 iocharset 값을 추가. debian 에서 기본 커널을 사용할 경우 iocharset가 iso8859-1 이기 때문에 한글 문제가 발생한다. 아래는 로케일이 ko_KR.UTF-8 일 경우 설정 창이다.

Debian/Clie 싱크하기

환경

  • Debian Linux Sid
  • Linux Kernel 2.4.20 (devfs 사용)
  • Clie T650
  • Gnome-Pilot2 2.0.10

커널 설정

아래와 같이 커널 옵션을 변경한 후 커널을 빌드한다.

CONFIG_USB_SERIAL=m
CONFIG_USB_SERIAL_VISOR=m

시스템 재부팅 후 모듈이 제대로 빌드되었는지 확인한다.

# /sbin/modprobe visor

kernel: usb.c: registered new driver serial
kernel: usbserial.c: USB Serial support registered for Generic
kernel: usbserial.c: USB Serial Driver core v1.4
kernel: usbserial.c: USB Serial support registered for Handspring Visor / Palm 4.0 / Clie 4.x

모듈을 올리고 Clie를 Cradle에 올리고 Hotsync 버튼을 누르면 /var/log/messages 파일에 아래와 같은 로그가 남는다.

/var/log/messages

kernel: hub.c: new USB device 00:07.2-2.3, assigned address 8
kernel: usbserial.c: Handspring Visor / Palm 4.0 / Clie 4.x converter detected
kernel: visor.c: Handspring Visor / Palm 4.0 / Clie 4.x: Number of ports: 2
kernel: visor.c: Handspring Visor / Palm 4.0 / Clie 4.x: port 1, is for Generic use and is bound to ttyUSB0
kernel: visor.c: Handspring Visor / Palm 4.0 / Clie 4.x: port 2, is for HotSync use and is bound to ttyUSB1
kernel: usbserial.c: Handspring Visor / Palm 4.0 / Clie 4.x converter now attached to ttyUSB0 (or usb/tts/0 for devfs)
kernel: usbserial.c: Handspring Visor / Palm 4.0 / Clie 4.x converter now attached to ttyUSB1 (or usb/tts/1 for devfs)

gnome-pilot 설정

gnome-pilot 설정 화면에서 아래와 같이 port를 설정한다.

참고

현재 evolution 1.4.4 에서는 evolution의 gnome-pilot용 conduit의 문제로 hotsync를 수행하면 한글이 깨진다.

Apache에서 외부 무단 링크 차단

외부 사이트에서 내 사이트에 있는 내용을 무단 링크하는것을 막는 방법이다. HTTP 헤더중 Referer 을 사용해서 접근을 금지시킨다.

편의상 현재 내 서버는 testserver.com 이라고 한다.

아파치 설정에 아래 내용을 추가한다.

SetEnvIfNoCase Referer "http://testserver.com" permit
SetEnvIfNoCase Referer "^$" permit            # 주소창에 직접 친 경우는 허용
<FilesMatch ".(gif|jpg|png|asf|zip|rar)$"> # 무단 링크를 막을 파일 확장자
    deny from all
    allow from env=permit
    ErrorDocument 403 "Forbidden"
</FilesMatch>

64-Bit Programming Models

한번쯤 읽어볼만한 글(링크)

DatatypeLP64ILP64LLP64ILP32LP32
char88888
short1616161616
_int32 32
int3264323216
long6464323232
long long 64
pointer6464643232

2006년 2월 1일

FeedReader

소개

FeedReader는 python과 php를 사용한 feed reader이다. feed(이후 채널로 표기) data는 python으로 제작한 프로그램을 cron을 통해 실행시켜 받아온 채널 data를 웹브라우저로 확인하게 된다.구글 리더가 쓸만해진 이후 개발 중단 상태입니다.

php로 작성된 RSS parser중 아직 python으로 작성된 parser 보다 좋은것을 발견하지 못했기 때문에 업데이트 프로그램을 별도로 작성했다(php 파서는 pubDate에 대헤서 python보다 처리가 미흡하다).

python용 feed parser 는 feed_parser를 사용했다.

설치가능한 환경

  • Apache
  • PHP
  • mysql
  • Python 2.3 이상. python-cjkcodes,libxml2-python, python-mysqldbdebian 경우 $ apt-get install python2.3 python2.3-cjkcodecs libxml2-python2.3 python-mysqldb 로 설치할 수 있다.

LICENSE

This program is free software; you can redistribute it and/or modify it under the terms of the GNU General Public License (GPL) as published by the Free Software Foundation; either version 2 of the License, or (at your option) any later version.

This program is distributed in the hope that it will be useful, but WITHOUT ANY WARRANTY; without even the implied warranty of MERCHANTABILITY or FITNESS FOR A PARTICULAR PURPOSE. See the GNU General Public License for more details.

To read the license please visit http://www.gnu.org/copyleft/gpl.html

설치

파일 받기

feedreader-1.02.tar.gz

압축 풀기

주어진 파일을 임의의 폴더에 푼다(여기서는 홈 디렉토리 밑에 tmp에 푼것으로 한다).

$ tar xvfz feedreader-1.0.tar.gz ~/tmp

압축을 풀면 디렉토리가 2개 생긴다. feedreader 는 웹 인터페이스이고 feedupdater는 채널 업데이트 프로그램이다.

각 디렉토리를 적당한 위치에 이동시킨다.

feedupdater/schema 디렉토리에 있는 mysql.sql 을 database에 넣는다.

$ mysql 사용할database < mysql.sql

설정

관리자 설정

feedreader/setup 디렉토리에서 아래 명령을 수행한다.

$ mv htaccess .htaccess
htpasswd -c .htaccess 관리자id

설정파일 편집

feedreader 디렉토리에서 config.php파일을 편집한다.

$db_server = "mysql 서버주소. 보통은 localhost";
$db_user = "mysql 사용자 이름";
$db_pass = "비밀번호";
$db = "database이름";

feedupdater 디렉토리에서 fetch_feed.py 파일을 편집한다.

return MySQLdb.connect( host = "mysql 서버주소. 보통은 localhost",
                        user = "mysql 사용자 이름",
                        passwd = "비밀번호",
                        db = "database이름" )

사용자 추가

웹브라우저를 이용해서 feedreader/setup 에 접속한다. 접속하면 간단한 사용자 추가/삭제 화면이 나오며 원하는데로 사용자를 추가한다.

crontab에 업데이트 프로그램 등록

feedupdater/fetch_feed.py를 적당히 crontab에 등록한다. 주의할 점은 반드시 인자로 사용자 id를 주어야 한다.

사용자별 채널 등록

웹브라우저로 feedreader 에 접속하면 로그인 화면이 뜬다. 여기서 등록한 사용자로 로그인 한 후 좌측 하단 메뉴를 통해서 채널을 등록할 수 있다.

변경 내역

1.03 not release yet

2006-02-01 Yun-yong Choi

  • 속도 개선을 위해서 feed 목록을 기본으로 안보여줌.

2005-02-12 Yun-yong Choi

  • fetch_feed.py multithreaded 버전 완성. 테스트중

2005-01-28 Yun-yong Choi

  • ui 일부 수정.
  • channel 목록 정렬기능 추가. 서버에 설치된 mysql 에서 utf-8 문자열에 대해 정렬을 제대로 못하는 것으로 보인다.
  • log view 추가. fetch_feed.py 실행시 추가 작업 필요.

2005-01-21 Yun-yong Choi

  • lastRSS.php 제거. 웹상에서 채널 정보를 업데이트 못하게 수정. (lastRSS.php에서 allow_url_fopen 옵션을 필요로 하기 때문에 보안상 제거.)
  • fetch_feed.py 에서 업데이트하도록 수정.

2005-01-21 Yun-yong Choi

  • class 구조 변경
  • fetch_feed.py 개선. 설정파일 추가.

2005-01-16 Yun-yong Choi

  • 검색된 문자열을 표시

1.02 release 2005-01-16

2005-01-16 Yun-yong Choi

  • 채널이름을 잘라서 표시할때 utf8 문자열을 제대로 자르도록 수정.(http://phpschool.com 의 tip&tech 에서 가져옴)
  • lastRSS.php 업데이트. 0.6 -> 0.9.1

2005-01-15 Yun-yong Choi

  • Purge 기능 구현

2004-12-22 Yun-yong Choi

  • 검색기능 추가

2004-10-17 Yun-yong Choi

  • UTF-8 로 이전

2004-09-24 Yun-yong Choi

  • javascript 버그 수정
  • fetch_feed.py 수정 : pubdate가 변경되었을때 db에 반영하는 기능 추가.
  • feedparser.py 업데이트. 3.0 -> 3.3

2004-09-04 Yun-yong Choi

  • 안읽은 글만 확인할 수 있는 기능 추가
  • ui 일부 변경

1.01에서 1.02 업데이트

아직 업데이트 프로그램이 준비되지 않았습니다. 수동으로 table을 dump 해서 iconv로 utf-8로 바꾼뒤 복구해야 합니다.

1.01 release 2004-09-01

2004-09-01 Yun-yong Choi

  • 안 읽은 글이 있는 채널은 Bold로 표시
  • 안 읽은 채널 관련 javascript 수정
  • javascript를 별도 파일로 분리
  • 몇몇 css 수정

TODO

  • 보관함에 category를 추가?
  • 모든 사용자의 채널을 업데이트하는 프로그램 추가?
  • IE에서 layout 일부가 깨진다. mozilla에서는 이상없음.
  • 업데이트 프로그램의 multi-thread or multi-process 화. 채널 수가 많을 경우 single process로 처리하면 시간이 오래 걸린다.

2006년 1월 17일

Palm/블루투스를 이용한 인터넷연결

Host(PC) 설정

XP 기준입니다.

  1. 내 네트워크 환경에서 등록정보(속성) 선택
  2. (인터넷 사용중 인) 네트워크 카드 -> 등록정보(속성) 선택
  3. 고급 -> 인터넷연결공유 -> 다른네트워크 사용자가 이 컴퓨터의 인터넷 연결을 통해... 허용 -> 체크
  4. 홈네트워킹 연결 부분에서 -> 블루투스 선택
  5. 들어오는 연결에서 등록정보(속성) 선택
  6. 사용자 -> Guest 체크

Palm Connection 설정

  1. Prefs -> Connection
  2. 메뉴에서 New 선택
  3. Name에 적당한 이름 넣기 예) Bluetooth
  4. connect to 부분에서 PC 선택
  5. Via 부분에서 Bluetooth 선택
  6. Detail 선택
  7. Speed는 115,200bps 선택
  8. Tap to Find 선택
  9. 검색된 블루투스 장치 선택 -> 비밀번호 넣기(컴퓨터의 블루투스 장비가 설치 되어있어야 하고 네트워크 접속 가능해야한다.비밀번호는 데스크탑의 블루투스 장치의 비밀번호와 같음)

Palm에서 Network 설정

  1. Prefs 에서 Network선택
  2. 메뉴에서 New 선택
  3. Name에 적당한 이름 넣기 예) 위의 둘째처럼 Bluetooth
  4. Connection 리스트에서 위의 둘째의 Connection에서 설정한 이름을 선택
  5. Detail 로 들어감
  6. Idle timeout 에서 Never 선택
  7. Script 선택
  8. End 네모를 눌러 Send를 선택 후 "CLIENT" 라고 적음
  9. End 네모를 또 눌러 Send를 선택 후 "CLIENT" 라고 또 적음
  10. End 네모를 또 눌러 이번에는 Wait For를 선택 후 "CLIENTSERVER"를 적음
  11. OK 누른 후 나움
  12. Connection 버튼 누름 (Disconnect로 버튼이 바뀌며 인터넷에 연결 됨